

NIMH GLT (Graphical Layout Tool)
Drawing Program for NIMH Cortex items files
[Description] [Features] [Download] [Installation] [Editing] [Items File]
Description
NIMH Cortex is a widely used behavioral control program for neuropsychology and neurophysiology. Included in Cortex is a graphics display program for drawing images on a computer screen. The images are described in a text format file called the items file. NIMH GLT is a Windows XP drawing program for graphically viewing, editing, and creating compatible NIMH-Cortex item files.
Features
NIMH GLT provides the following features
- Reads and writes Cortex items files
- Displays selected items on a drawing screen
- Direct screen manipulation of items
- Resize, rotate, and re-color item with the mouse
- Multi-object drag/edit
- Snap-to-grid
- Direct text entry of item properties
- Easy rescale of drawing screen for different DVA settings
- Open Recent File List
- Undo/Redo commands
- Cut/Copy/Paste commands
- Supports and displays bitmap images, including resizing
- Supports playback of some movie formats (avi, mpeg)
Installation
GLT requires Microsoft Windows XP or Vista with current service packs. It also requires Microsoft Dot Net Framework 3.5 or later (free download from Microsoft). First download GLT by clicking here . Unzip the file to your hard disk. Then, run GLT2.EXE. If it starts and dies immediately, make certain you have the latest version of Dot Net Framework installed, otherwise you may try one of the sample item files included.
Working with an existing items file
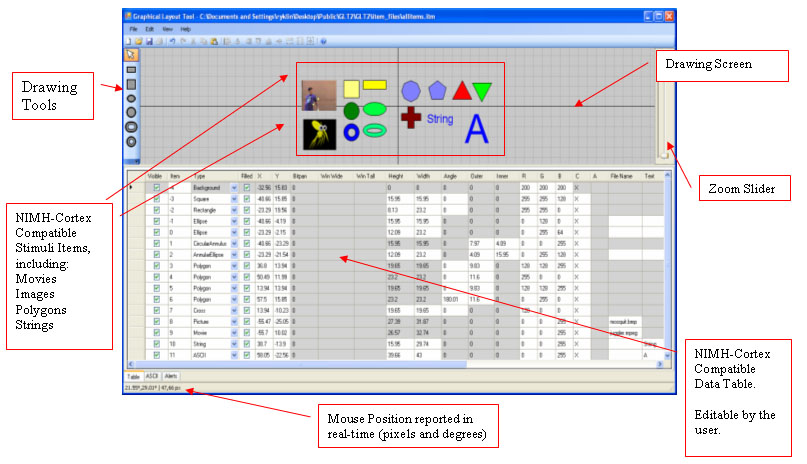
Using the File Menu to find and load an existing items file. If you are new to NIMH Cortex, go to the DEMOS subdirectory and find the DEMO.ITM file. Once loaded, the items should be visible on the drawing screen (see figure above). The parameters for each item are listed in the interactive parameter table below the drawing screen (called Table). Each line of the Table defines one item, just like in the items file. A tab, labeled ASCII, near the bottom of the GLT window lets you view the same information as an items file. If the items are too large or small for the drawing screen, use the slider bar to the right of the screen to zoom in or out. Just like NIMH Cortex, the center of the drawing screen has a coordinate of 0,0. The position of the mouse pointer is shown in degrees of visual angle (DVA) values and in pixels at the bottom of the GLT window. However, for these values to be accurate, the user must set a viewing distance using the View / Settings menu item; distance values are in millimeters.
Check boxes in the Table determine which items are visible on the drawing screen. To hide an item in the Table, just click on the "visible" checkbox for that item to remove the checkmark. You can hide or show all the items by selecting all items (see below), then clicking any one of the "visible" checkboxes.
Selecting items with the mouse
A single item can be selected on the drawing screen with a mouse click. Multiple items can be selected on the drawing screen with a click-and-drag rubber-band function. Only visible items can be selected on the drawing screen. Selected items are highlighted in the Table below the drawing screen. A single mouse click in any column of the Table will select a single item. If you hold the CTRL key, you can select any number of items one-at-a-time using the Table. If you select an item with the table and keep holding the mouse button, sliding the mouse will select adjacent items.
There are several ways to select all items. The menu command Edit / Select All will select all items. CTRL-A will also work. Here is a mouse shortcut: click the drawing screen once, then click the upper left corner of the table (just to the left of "Visible"); all items will be automatically selected.
If multiple items are selected, a single parameter can be changed for all the items. First select the group of items. Hold down the CTRL key and select a parameter in the Table. Release the CTRL key and change that one parameter.
Manipulating drawing screen items with the mouse
Selected items will have a white rectangular boundary. The zoom slider on the right can be used to optimize manipulations of the item. The item can be resized, moved, copied or rotated with the mouse. The mouse actions can be interspersed with changes made to the Table. Often, it is helpful to use mouse actions and table changes in conjunction with each other. For example, a bar can be rotated to the desired position with the mouse, then the angle can be rounded to the nearest 5 degrees with the Table.
The snap-to-grid function works on the upper left corner of the white rectangle boundary when moving an item. When resizing an item, both sides of the boundary move evenly to preserve the coordinate of the item center. That is because Cortex saves item positions relative to the center of the item. The snap-to-grid function may not always be the best way to align items of different sizes. For example, if the boarders of a item snap to an even number of grid marks, the center of an item will also snap to a grid point. Otherwise, the center of an item will not snap to a grid mark. Sometimes the best way to align the center of items is to use the Table.
Reposition: Choose the arrow tool. Place the mouse anywhere within an item. Click and drag the mouse to move it. The item will snap to grid if that option is enabled under the VIEW drop-down menu. Even if the snap-to-grid option is enabled, you can nudge the item by holding down the ALT key and using the four keyboard arrows. The nudge continues to work even if the item moves away from the mouse cursor.
Rotation: Right click on an item to rotate.
Color: Select an item. Find the fill color tool to the left of the drawing screen. Single click the tool to match the item to the tool color. Double click the tool to find a different color for the item.
Copy: Select an item. Use the EDIT / COPY drop down menu (or CTRL-C) to copy the item and EDIT / PASTE (CTRL-V) to create a copy. The new item will be assigned the next available item number.
Drawing tools
The drawing tools are just left of the drawing screen. They include the selection tool, rectangle tool, circle tool, annulus tool, text tool, bitmap tool, and color fill tool. The color tool sets the fill color of objects drawn with other tools. Double-click the color fill tool to change the active fill color.
Draw Rectangle: Select the rectangle tool (left of the drawing screen). If the snap-to-grid feature is enabled, the boundaries will be on the grid. Click and hold the mouse to establish one corner of the rectangle and drag the mouse to position the opposite corner. To change the color of the rectangle, use the select tool to select the rectangle, then click on the color tool to find a new color.
Draw Square: A square is a rectangle with equal length sides. GLT can convert any shape into a square (see below), but Cortex does not recognize the "square item". Change the item type to rectangle before using it with Cortex.
Draw Circle: Draw a circle by drawing its rectangular boundary. The item will be treated as an ellipse, even If the width and height match. Use the Table to redefine the item as a circle. A circle is always resized evenly in all directions.
Draw Ellipse: Draw an ellipse like drawing a circle. Use the rotate function to change its angle.
Draw Annulus: Draw an annulus like drawing an ellipse. However, after drawing the boundaries release the mouse and draw the inner "hole". Click the mouse when the inner hole size and shape are correct. Both the inside and the outside are resized when the ellipse is resized. There is no way to redraw just the inside dimensions with the mouse, so use the Table to resize the inner part.
Place Text: Click on the text tool, select a font, enter text into the text box, and move the mouse to position the text. Cortex supports two type of text: 1) a single character, or 2) a string saved in a text file. Cortex has only one font size.
Place Bitmap: GLT cannot create a bitmap, but it can place a bitmap on the drawing screen. Select the bitmap tool and use it to browse to a bitmap file. After selecting a bitmap file, position the picture on the drawing screen. Because the path information used by GLT may not match path information used by Cortex, GLT removes the path information of the bitmap file. Put all the images into a single directory and specify that directory under the menu: SETTINGS / PATH TO IMAGES.
Creating a new items file
You can create a new items file with GLT. The first four items must be numbered -4, -3, -2, -1, and 0. These are special items. NIMH Cortex uses the color and other properties of these items to define default values for background screen color, etc.:
Item -4 default background color
Item -3 default fixation spot
Item -2 default reference field
Item -1 default reference point
Item 0 default play item
Items files are described in detail on the NIMH Cortex manuals available via the NIMH Cortex web site hosted by the Salk Institute. These files have a fixed column format. The first line marks the fixed column format and should not be altered. The first and last character of each keyword in this first line demarcate the beginning and end of the data field. Enter values on the those fields. Spaces are allowed, but tabs are not allowed. Items are entered one line per item.
Item property table
| Bar, Square (Rectangle) |
Circle | Circular annulus |
Reserved | Character (ASCII) |
Bitmap (Picture) |
Ellipse | Annular Ellipse | Movie | Polygon | String | Cross | |
| TYPE | 1 | 2 | 3 | 4-6 | 7 | 8 | 9 | 10 | 11 | 12 | 13 | 14 |
| FILLED | yes/no | yes/no | yes/no | yes/no | yes/no | |||||||
| CENTER X | center x | center x | center x | center x | center x | center x | center x | center x | center x | |||
| CENTER Y | center y | center y | center y | center y | center y | center y | center y | center y | center y | |||
| BITPAN | no/auto/manual | no/auto/manual | ||||||||||
| HEIGHT | height before rotation |
not used | height | outer height | not used | height before rotation |
||||||
| WIDTH | width before rotation |
not used | width | outer width | not used | width before rotation |
||||||
| ANGLE | rotation angle |
rotation angle | rotation angle |
|||||||||
| OUTER | diameter | outer height | inner height | radius | ||||||||
| INNER | inner height | inner width | ||||||||||
| RGB | RGB color | RGB color | RGB color | RGB color | RGB color | RGB color | ||||||
| C (color) | standard color |
standard color |
standard color |
standard color |
standard color |
standard color |
||||||
| A (ascii character) | character | |||||||||||
| FILENAME | file name | file name | string | |||||||||
| PATTERN FILE | pattern file | pattern file | pattern file | pattern file | pattern file | |||||||
| FLOAT1 | ||||||||||||
| FLOAT2 | ||||||||||||
| INT1 | number of sides | |||||||||||
| INT2 |